Showing posts with label Stampin' Up. Show all posts

Nov 3, 2009

Digital + Starter Kit

Greetings and happy evening!

In the cool and spiffy news department, Stampin' Up! (SU!) has come up with a new Starter Kit option.  Do they rock or what?!  This one includes My Digital Studio (MDS) plus a bunch of related stamping toys.  By spending $185, you get over $295 of new toys living in your house - PLUS a 20% discount on all your stamping "needs." 

But WAIT - there's MORE!  Your first order of $150+ will be yours for a 30% discount.  Such a deal!!!  As if that weren't enough, did you know that whenever SU! has a sale, demonstrators still get their 20% discount?  The gurus in Utah are darn good at keeping us happy.  I love this "job!" 

Wanna see a picture of the new starter kit?  Well here ya go:


Contents include:
  • My Digital Studio software
  • Party Hearty and Petal Pizzazz stamp sets
  • Whisper White card stock (8-1/2" x 11")
  • Earth Elements assorted card stock (8-1/2" x 11")
  • Old Olive, Pumpkin Pie, Real Red, and Tempting Turquoise Classic Stampin' Pads
  • Chocolate Chip, Old Olive, Pumpkin Pie, and Real Red Stampin' Write markers
  • Chocolate Chip 1/4" grosgrain ribbon
  • Real Red 1" double-stitched grosgrain ribbon
  • Button Latte Designer buttons
  • Stampin' Dimensionals
  • Mini Glue Dots
  • SNAIL Adhesive
  • Business supplies (product catalogs, order forms, training DVD, and other supplies)
No, you don't have to sell a bazillion dollars worth of stuff every month to stay active - the quarterly minimum is $300.  If you're just interested in getting the Starter Kit toys and then the big discount on your first order, you can do that, too!  Interestingly, I have several customers who have gone for that option.  Then, when they're done being demonstrators, they go back to ordering from me.  Truly not a trauma.


I joined 5 years ago because I wanted the discount.  I had no intentions of ever becoming a demonstrator who held workshops and did stamp camps.  You see how well that worked for me!  Right now I just can't see doing much more than I currently am, but I will admit to really (REALLY) wanting to go on one of the incentive trips.  Then there's Leadership convention.  THAT would be a great time!  And and and and.......

OK, so now you have the details.  If you have questions, feel free to ask.  If you have to join my Gettin' Inky team today, head on over to my SU! website HERE and use the super-secret code "StampWithTricia" to join.  Welcome to my amazingly talented and fun team!!!!!!

Oct 28, 2009

Fun Fold and Tweak-age

Greetings and aloha!

OK, so I saw this awesome concept on a blog somewhere in the universe.  I have been through my notes and have evidently eaten the original info.  Or one of the kids deleted if from my computer (highly unlikely at this point in their lives).  So if it was your ingenious idea, you rock!  If not, then know that someone out there is awesome ...... when I find the details, I will provide appropriate credit.

All that aside, here's the card:


To make the punch-out happen, you need the Movers and Shapers Curly Label die for your Big Shot (you NEED this tool!!!!).  After doing one backward and inside-out and upside down, finally all the braincells clicked at the same instant and voila!  Half of a punch that layers with a regular punch! Next one is to try the heart from the Punch Window group (pg. 201).  I think that would be awesome!

Liza, if you're reading this, I designed it for you.  Yes, I know you never got it.  I ended up sending you a different "happy engagement card," but this was my first idea!  You're welcome.  :-)  So yes, it took some figuring out, but I had a great time playing and experimenting.

I used Friends 24-7 (seems I like that set) and Bella Bleu DSP (Designer Series Paper).  It's Not Quite Navy that matches so spiffily, along with Very Vanilla.

That's it - now go play with your Big Shot and see what trouble you can cause!!!!!  (have fun!!!!!!!)

Oct 26, 2009

It's NOT My Fault!!!

Stampin' Up! came up with the whole Deal of the Week thing - they didn't even ASK me if I thought it would be a good idea.  Imagine!

So I have been looking at the cute little Princess and Pirate Party thingies ever since the catalog came out in July.  We have birthdays in January and February, so I wasn't in a rush.  Now Stampin' Up! decided that those very items need to go on sale.  I HAVE to get 'em ..... there really isn't a discussion.  Don't you agree?!?!?!?!

So here's what they look like:

Are those too cute for words or what?!  It seems the pictures don't want to enlarge when you click 'em, so go HERE, click on your favorite, and then hit the little (almost hidden at the bottom left of the image) "More Images" thingy and have fun.  Cool, huh?!  

Yes, because you're shopping at my Stampin' Up! business website, you get the "Preferred" pricing (which, conveniently, is the same as in the big catalog).  To get that price, you just have to say that you are ordering from me and it's OK for me to know that.  If you wish to remain incognito, that's fine, too.  So you know, the profit from all the folks who want to remain anonymous goes into a giant pool (not the liquid kind).  At the end of each month (or quarter, depending upon how much $$$ is actually there), that money is split between ALL active demonstrators who have websites.  Amazing, huh?  Typically, I make four to six cents a month on those sales.  Takin' it to the bank!!!!!!!! 

OK, I am all better now.  It rained all day and I am kind of wiggly.  Time to run away from the computer and finish my last project for Stamp Camp.  It's not 'til Wednesday .... plenty of time(?!?!?!?!?).  Happy inking to all and to all a good night...........

Christmas Lattice

Christmas is such a joyous time of year - too bad we don't take such good care of each other throughout the entire year.  Imagine how different this world would be if we took the time daily to allow Christ's love to shine through us and to make another life just a little more pleasant.  I think I need to be the one to begin .... starting now.  (thanks for listening!)

I copied this idea from somewhere, but I have seen it sooooo many places, I have no idea who the originator is.  So thanks to all of Blogland for sharing your incredible ideas with all of us.  You rock!!!

This is the Lattice die cut twice - with the indispensable Big Shot (do you have yours yet?!).  Before adhering to the card, I mushed VersaMark all over one side, coated it in Iridescent Ice embossing powder, and then heated.  Holding that little booger still gets exciting, just in case you need to know that.  Then I just kept wiggling the pieces around until all the sudden it looked like a snowflake.  You want the pieces at 90 degrees from each other - attaining that exact angle proves to be more exciting than previously imagined!

To attach it to the card front, I used well-placed dimensionals.  Where two different papers crossed, I added the stickyness there.  Holds really well!  Here's what it looks like:

The sparkle in the picture is pretty much non-existent.  IRL (in real life) it's WAY fantastic!  Also hard to see in this photo are the background snowflakes done in VersaMark.  Such fun!  The most striking version of this card I have made is with Basic Black, Real Red, and Very Vanilla.  It also looks nice with Night of Navy instead of the black.  I am sure there are about a bazillion other color combinations that will work. 

Have fun, and may you have an inky day!!!

Oct 25, 2009

Birthday Stack

Happy Birthday!  OK, someone probably has a birthday today, but I don't really know who.  But we all need birthday cards of some sort to be able to send to everyone we have ever met.  Or something like that.

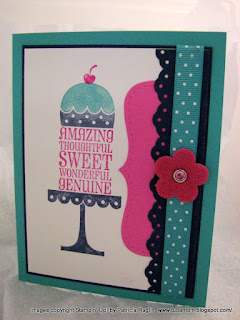
I am not usually a turquoise sort of a girl, but this one was pretty fun to play with!  I love how the layers of On A Pedestal stack.  Using your Stamp-a-ma-Jig, you can make this cake as tall as you like.  OR, if you're feeling a little more adventurous, mask off the part of the pedestal that holds the cake, then make the flat part of the cake be up - now you have a fancy drink glass (margaritas, sangria, etc.!).  Such a fun and versatile set - and under $20!!!  This one is not my original idea at all.  As a demonstrator, we have an EXCELLENT (pardon me for yelling) resource online called Stamper's Showcase.  All sorts of card and project samples exist for us to play with and get more ideas from (don't end a sentence with a preposition).  I love that when my braincells stop working, I can borrow someone else's!!!!!

Here's my (cased) card:


Fun, huh?!  Because I didn't anything that specifically says "birthday," I can send this for any occasion.  Life is grand!!!

Here's how I made it:

Stamp Set: On a Pedestal

Colors:  Bermuda Bay, Night of Navy, Pink Passion, Shimmery White paper
Accessories:  Top Note Bigz Die (a must-have!), Eyelet Border Punch, Ribbon, Felt Fusion, Rhinestone Brads

May you have a wonderfully inky day!

Oct 24, 2009

Classy Bird

Aloha once again!  It's mildly freaky that I am posting daily after ignoring this little blog for soooooo long.  I am not ever gonna promise that I will post daily, but I will post as often as my schedule allows.  How'z that for a good non-answer?!

Here's a spiffy (and classy) bird card that we made in a stamp camp a while back.  It was one of those cards that made everyone drool.  Got all over my stuff.  Silly stampers.  Well, that or they liked it a whole bunch!  Here's what it looks like:

After running the So Saffron piece through my Big Shot (you NEED this!!), I dabbed on a little adhesive (the Tombow liquid stuff ).  I then covered the world in Dazzling Diamonds glitter (my daughter rolled in it).  There's a wonderful sparkle IRL (in real life), which makes it less subtle, but still classy.  Really.  I wouldn't kid you about something like that!  (probably)

The sentiment is from Wonderful Favorites.  I didn't know who I was gonna give this to, so I didn't put a label on it (sister, friend, daughter, grandma, etc.).  But I do like how it looks with just the "wonderful" part.  I think I won't change that.

There's also a bunch of sponging on this card.  Before adding glitter and glue, I sponged the edge of the Saffron piece.  I also sponged the edges of the vanilla pieces, just 'cuz it was fun!  Although making a billion of these would be annoying, this really wasn't a majorly time-consuming card.  Pretty fun to put together!

I hope you have a wonderfully inky day!!!!

Parts to make this:

Stamp Sets:  Friends 24-7, Wonderful Favorites


Colors:  So Saffron, Chocolate Chip, Very Vanilla
Accessories:  Sponges, Tombow Multipurpose Adhesive (OR Two Way Glue Pen), Dazzling Diamonds Glitter, ribbon, Scallop Edge Punch

Oct 23, 2009

Aliens Everywhere!

This little Greetings Earthling set is thoroughly entertaining!  I love that you can stack the little guys, or even use the squiggle in different ways (brain cell departing, laser ray gun waves, boinging ailens,....).  I found a tutorial for Wiper Cards on Splitcoaststampers and had some fun.  When the card is closed, the "wiper" with the sentiment folds into the card.  It makes me giggle to play with this one!  (now you understand more about me, don't you?!)  Anyway, here's the cute little alien guys:


May you have a beautiful day, whether you're dealing with little blue aliens or not!!!

Here's the stuff I used to make 'em so very cute:
Greetings, Earthling

Paper: Watercolor Paper, Kraft, Brilliant Blue, Razzlebery Lemonade Designer Series Paper (DSP)
Accessories: Black Embossing Powder, Aquapainters, Bead Duo (orange), Crystal Effects, Ribbon

Oct 22, 2009

Playing with Scrapbooking

OK, so it seems that my time playing on the computer is starting to be productive.  Who knew?!  Below is one of the pages of the Zoo scrapbook that has arrived at my house!!!!!!!!  Is that the awesome-est news ever or what?!  Anyway, here's one of the pages:


Is that precious or what?!  Yes, I know, as the mommy I am supposed to be prejudiced, but come on!!!

I hope that your day is amazingly wonderful!!!!

~Tricia

Oct 21, 2009

Halloween Treat

Happy Halloween, all!!!  OK, it's a tad early, but if you have urchins, you're preparing now....

I saw several blogs with a lollipop made out of Sweet Treat Cups from the mini catty. I was then "forced" to make my own version! I'm gonna make these for the kids we go trick-or-treating with in a couple weeks. We're out in the country enough that we only get one or two kids ringing the bell that night. Dianne, one of our buddies down the street, started taking out their hay wagon one year, and now it has become a tradition! We gather up the munchkins and sit on the hay bales and go trick-or-treating together. I will make these, Dianne has glow sticks, and we'll all have lots o' fun! Last year, the Headless Horseman followed behind us for a couple blocks. His horse kept eating hay off the back. What a treat!!!

Enjoy your day, and have a great time Gettin' Inky!


Photobucket


Posted by PicasaHere's what I used to make this treat:

Sweet Centers (mini catty pgs. 6 - 7)  119232  $29.95
Sweet Treat Cups (mini pg. 7)  116802  $2.95 for 12
1-3/4" Circle Punch (pg. 186)  112004  $15.95
Ribbon - Black and White Gingham and Pumpkin Pie 1/4" Grosgrain (pg. 183)


Oct 20, 2009

Deal of the Week

Greetings and happy Tuesday!  Yesterday, posted on the Stampin' Up! website, was yet another Deal of the Week.  We get to order the cool toys below at a nice discount through this coming Monday morning at 10:50am our time.  Then, at 11:00am, the final Deal of the Week will be unveiled.  No, I don't know what's gonna be next.  I only know that this is now:

 Deal of the Week #3

Item # Page Description Regular Price Special 
114348 179 Basic Jumbo Grommets  $          6.95  $    4.49
109857 179 Mini Library Clips  $        12.95  $    8.99
112571 179 Circle Designer Brads  $          5.95  $    3.99
112581 179 1/2" Library Clips  $          6.95  $    3.99


May you have a great time shopping!!!

Oct 19, 2009

I'm Back .....

I know, you have missed me (thanks, Annette!).

I have been playing with My Digital Studio (MDS). Actually, it's way more fun than I ever thought! I made a scrapbook of our travels to the zoo (a very frequent trip with munchkins), and I made a card. I know, I can't imagine that I will actually mas produce any cards digitally, but there are folks who think this whole create-it-with-paper-and-ink idea is silly. Can you even imagine?!

Anyway, here's my digitally produced card:


I have lots more to learn using the program, but it's a ball to play with! I keep trying to create a scrapbook using the traditional method, but have not been successful completing anything. But I have an actual book that will arrive at my house in the next few days that should be darn spiffy - come on over and I'll show ya!

It's a beautiful day here in central Texas .... time to go enjoy it!

I'll be back later with more inky-ness!

Photobucket

Jul 26, 2009

Have Your Cake and Eat it Too!

This was such a yummy (pun intended!) card to create. The glitter on the frosting adds a wonderful touch, as does the Crystal Effects on the cherry. That one is hard to see in this photo, but trust me, it's there! The kids have done a very thorough inspection to be sure that it's raised. Many discussions on that topic!

I actually liked it a tad better using giant circles of White Gel Pen in the corners. But it seems that I have already given those away. Oops. I used one of the guides from the Mat Pack and plopped it in the corner. Colored in the big ol' circles with my trusty gel pen. I believe it was Sue that did the big dots first (you rock, by the way!). It's so much fun to have an idea of how to complete the project and then have everyone in attendance tweak it just a tad to make it their own. I love stamping!!!


The stamp set I used is new to me - On a Pedestal. Pretty fun to play with! The images are meant to stack on each other in all sorts of funky ways. You can add words to the cake and make it tall - or insanely tall, if you're so inclined! You can also ink up only the bottom and stem of the cake plate, turn the cake upside down, and now you have a festive drink glass (sangria, margarita, Shirley Temple,.....). Or you could turn the cake the other way and have a lamp. How awesome to have so many fun options with this one stamp set!


I am doing some playing and creating and having fun (along with the chasing of the urchins). Some changes are in the works for my world o' stamping. It seems that there are only 24 hours in the day (drat!) and they're already spoken for! I have a plan, but it's being tweaked right now. No traumas yet, I promise!

Have a wonderful week, and know that I look forward to Gettin' Inky with you soon!

Photobucket

Jul 25, 2009

Medallion

Can I tell you how much I love this stamp?! OH MY!!!! We made this card during Stamp Camp this week and there were lots of "oooooooohhhhhh's."


The process was easy. The secret was the paper! I first stamped the image on Naturals Ivory cardstock. It has little dots all over the place, which add a touch of extra depth to the card. The Naturals White is the same way, but it's not quite a true white (and didn't go with the Kraft and Chocolate Chip quite as well as this one).

Next, I sponged the edges with Chocolate Chip, and added a couple holes with the Paper Piercing Tool (I love that this is available on its own now!). Add the Brad (from Hodgepodge Hardware), attach everything together, and Presto - Spiffy Card! The ribbons are both Chocolate Chip, the thicker one being Grosgrain and the bow is Taffeta.

I failed to take a picture of the inside (duh!). I stamped off once and then put the offset Medallion on the inside, too. Ties the card together nicely.

I'm off to chase the kiddos for awhile, then it's Doug's Surprise Birthday Party! Don't worry, I can't imagine that he's reading my blog (Ha Ha!). Woo-hoo .... fun adult socialization. What a treat! (thanks for babysitting, mom!)

Here's hoping that you have a wonderful weekend and manage to stay cool. I'll be here Gettin' Inky!
Photobucket


Card Recipe: Medallion
Silver Hodgepodge Hardware (Vanilla is on sale through Monday early morning)
Mat Pack
Paper Piercing Tool
Chocolate Chip, Kraft, and Naturals Vanilla Cardstock
Chocolate Chip ink
Click HERE to shop on my website - have fun!!!!

Jul 11, 2009

More Printed Window Sheets

I'm tellin' ya - I love these things! Each one I have made has had some tweaking - like the painted flower from the Pretties Kit. Just grabbed the Aqua Painter and dabbed some Old Olive ink on it. Let it dry, attach with a Glue Dot, and all is well with the world. As a side note, I really like the close-up of the flower, but don't know why the card decided to be soooo much smaller. They're supposed to be the same size! (still a learning curve, it seems!)


To hide the adhesive, I make sure to put an accessory of some sort above the tape. In this case, I made a line of SNAIL on the window sheet under the Celery Grosgrain Ribbon. Then there's a glue dot under the big flower. That's plenty to hold the plastic on the card.

As far as "normal life" is concerned, we went out to dinner last night, and Ryan decided to get a fever. All was well until we sat down at the restaurant. He was REALLY upset by the air conditioning. He cried and told us that since we're in Texas, everyone is used to the heat (104 yesterday). He thought they should just turn the air off. Now that's realistic! So I felt his forehead - hot hot hot. We got home and took his temperature - 101. He went to sleep about 30 minutes later.

He seems OK today, but still a tad on the fragile side. Poor little guy! At least he's not lobbying for turning the AC off in the house ......

Hope you're having a great weekend!


Photobucket

Jul 10, 2009

Printed Window Sheets

Greetings and happy Friday to all!

I have had the best time playing with the printed window sheets on page 169 of the catalog. I got the 8.5 x 11 size and had some fun! Other than a plethora of fingerprints (which wipe off easily with a soft cloth and a little warm breath), they were really simple to use. Here's one of my creations:


The dots are the window sheet. The card base is the new Melon Mambo In Color. As a side note, my Melon Mambo ribbon disappeared the other day. Imagine my surprise to find it downstairs with my little red-headed-everything-pink-is-mine thief! Kristen was sooooo thrilled to find an entire roll of pink ribbon with white polka dots. I don't think life can get much better than that. Thanks to the suggestion of some wonderful friends (??????), now she wants a dress made from the ribbon. NOT gonna happen!

I used the new Modern Label Punch on the sentiment. Fun, quick, and really easy. Did you know that the Modern Label Punch is perfect with all the words and phrases from Teeny Tiny Wishes on page 145?! To make it worse, you can layer with the Word Window Punch for all those, too. Oh my! I am sooo in trouble with this new catalog. Thank goodness it's gonna be good for an entire year!

I am off to cause more trouble and play with some ink. Well, that or make dinner. One of those options would be WAY more fun than the other. Ah, the life of being a mommy (love it!!!!!!!).

May you have a day filled with ink and complete joy,

Photobucket

Jul 6, 2009

Lost Marbles

No, not mine. But thanks for asking! :-)

It seems that the kids "needed"to borrow the marbles from the craft room, but "forgot" to put 'em back. Imagine! So Ryan allowed me to use some of his marbles, but I was given strict instructions. No gluing 'em to the paper, I couldn't change the color, basically I was only allowed to look at them. He can be so helpful.

So when I put the marbles in an empty stamp set box and added a drop of re-inker, I thought he was gonna lose it. All turned out well in the end - he even has all his marbles back. That's more than I can say for myself. LOL

Anyway, here's the marbled background technique sample:


I used two separate boxes to make this happen - Tangerine Tango (now retired) and Summer Sun. Tape the white piece of paper on the lid (Dotto works perfectly!). Now turn the stamp box upside down and wiggle. Do this as long as you like. It's fun, and could be considered exercise (as long as you put the chocolate down first!).

Once you have the coverage you like, remove from the first and do the same thing with the second. Ryan actually helped make this background. He had a blast (and finally forgave me for using the re-inkers).

The stamp set I used for this card was Flight of the Butterfly. I am sooooo excited that there is a punch for the big butterflies in this set in the now current catalog!!!!!! Mine has been ordered and I am patiently (???) waiting for Mr. UPS to knock on my door. He's not here yet. Bummer......

Happy Monday and welcome back to the work week. Our last week was interesting, but I am not in the mood to talk about car repairs yet. We still don't have a working vehicle (we used to have two), but are hoping that is fixed by at least mid-week. Yes, mid-week. AAAAAARRRRRRRRGGGGGGGHHHHHHH!!!!!!!!!!

May your day be filled with ink and paper and happiness .... and chocolate!

Have fun Gettin' Inky,

Photobucket

Jul 4, 2009

Fun Bird

This is a card I found great inspiration for on www.SplitCoastStampers. Here is the original. The designer is luvmyboys&stampin (I know .... not her real name .... but that's not listed!).

You can tell that I changed the colors (slightly) and didn't use the Color Spritzer Tool. Otherwise, I really (REALLY) liked the design and the way everything went together. What a wonderful creative genius I found!!!!! As I am sure you know, when you find something truly awesome, you really shouldn't change much! :-)


May you have a wonderful 4th of July weekend!

~Tricia

Happy 4th of July!

What better way to celebrate our nation's independence that with a little ink and a lotta chocolate?! I found this idea on Dawn Griffith's website, but hers was done with the smaller sized candies. You know, like the Halloween size. I decided that my fingers were bigger than that, plus I wanted to be able to use my punches instead of cutting everything. Pretty easy!


You can make this happen on any candy bar or box-shaped-thing. Just measure around the outside (circumference) and add about 1/2 inch. The height I used was for the candy only, so that the ends would stick out slightly (that makes it easier to get at the chocolate!). Put the candy in the middle of the cut-out box and mark where the score lines need to exist. Don't forget to turn the bar on its side so you can get the extra marks! Then, a little Sticky Strip to the edge, and you're good to go!

I used whisper white for the base, brilliant blue with Itty Bitty Backgrounds (stamped in craft white) are underneath the big star, and Real Red for the stripes. To adhere the stripes, I used the Two-Way Glue Pen. That allows for a little forgiveness before the adhesive lives there forever! The blue was punched with my 1-1/4" square punch after stamping the mini-stars. 2-Way Glue Pen on the white parts with Dazzling Diamonds Glitter makes it more fun! Also, after using the Star Punch, add glue and glitter there.

May we all remember those who gave their lives so that we may live and worship freely in this wonderful country. Happy 4th of July, everyone!

Photobucket

Jul 2, 2009

Watercolor Splash

I love this technique! I found it in several places online, one of my favorites being www.splitcoaststampers.com. (I know you find that amazing!)

The key is to use cardstock with sparkles in it - which would be Shimmery White. I tried it with glossy, and it just looks flat and doesn't dry well (or very quickly).

Here's my version, using Fifth Avenue Floral:


To make this amazing project happen, the secret is water. On your Shimmery White cardstock, stamp an outline image with VersaMark (or white craft ink) and emboss with white embossing powder. Give it a couple seconds to dry, and then squirt 3-4 times with water. If you don't have puddles on the paper, add more water. Don't be shy - this really works!

Now, with your Aqua Painters, pick up a little bit of ink (a drop in the lid of the ink pad works well). Instead of trying to paint with the Aqua Painter, squeeze the ink off as you touch the paper. I know, more water! As the brush touches the paper, the ink spreads through the open image. COOL!!!!!

Different colors of ink dry with different color combinations ..... that you may not be expecting. On this project, I used Lovely Lilac and Almost Amethyst. You can also see Tempting Turquoise, which I did NOT use. Weird, huh?! Also, you may not need to pick up more ink on your brush - it depends upon how much is already there. Have some fun and experiment.

As a spiffy side note, I did two flowers that I was sure I had messed up. Since they were wet, I just put 'em aside to dry and then thought I would throw 'em away later. Didn't need to - they were awesome!!!!! Be patient and wait for the finished product to exist - you will loooove it!

You can use your heat tool to speed drying - sort of. You don't want to burn the embossing powder into the paper - bad things will happen. But it does help to dry the paper a tad.

Have fun, and may you enjoy an inky evening!

~Tricia

Jun 26, 2009

They're Here!!!

I love my UPS man. He brought boxes of catalogs just for me!!!!! Well, OK, they're really for you. Stop on by and grab one .... they're $6 each. If I am not here, they will be on the porch - honor system. Just leave your $$$ under the mat and all will be well with the world.

Have a fabulous weekend!!!!!!

~Tricia